Manual OSS Installation and Configuration of Web ViewPoint Enterprise
NOTE: In order to do the manual OSS Installation and Configuration of Web ViewPoint Enterprise, you first need to do the manual OSS Installation and Configuration of My NonStop. The steps for the same are here.
Once you’re done with the Pre-Installation Setup of Web ViewPoint Enterprise (steps above), if you installed your My NonStop manually, then you’ll be prompted with the following steps. Logon to a TACL session with your user credentials.
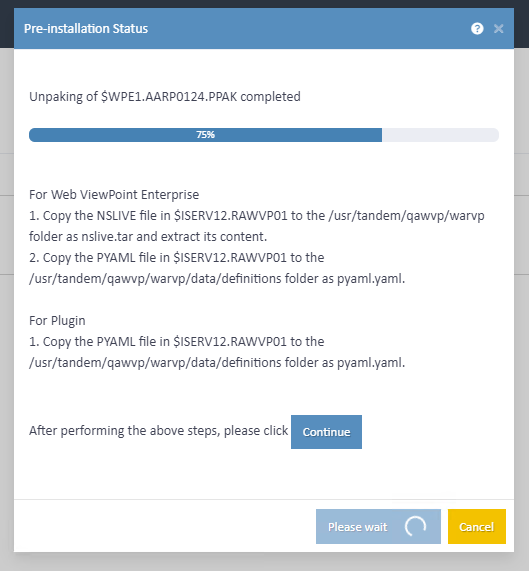
First, you will be asked to copy your NSLIVE file in the Guardian Volume Subvolume to the specified OSS location. Note that you will need to create a new directory for the specified OSS directory name. Once done, you can set up access permissions for that directory.
> chmod 755 new-directory-name

Now the user can copy the NSLIVE file from the guardian location into this OSS directory. After it is copied, the user must extract the file in this location. The next step is to copy the PYAML file from the guardian location to the specified OSS space. Note that extracting the NSLIVE file earlier already creates the required OSS space for the PYAML file.

Once it is copied into this OSS space, the user can go back to the Web ViewPoint Enterprise Installation Wizard and click on Continue.
Installation Process
Upon successful transfer & extraction of the files, it prompts for a series of Startup & Configuration parameters for you to choose from.
Setting the System Name on the Logon screen
- To update the ‘\NODENAME’ to the actual system name (Eg; \CTD7S), you’ll have to change the host.txt file present in the ‘data’ directory within the OSS location of your Web ViewPoint Enterprise instance.
- Via an FTP file transfer program (e.g. Filezilla), connect to the Nonstop server OSS location of your WVP E instance (e.g. /usr/tandem/qawvp/vitwvpe/data) and transfer the host.txt file to anywhere on your local PC in ASCII mode.
- On your local PC, open the host.txt file in Notepad (or any text editor) and edit NODENAME to the actual system name ( Eg: CTD7S).
Note: Do not add ‘\’ before the nodename. - Save the changes and replace the host.txt file in the ‘data’ directory within the OSS location of your WVP E instance (Eg: /usr/tandem/qawvp/vitwvpe/data) with the updated host.txt file.
- Stop and restart the WVP E instance (you can do that from My NonStop -> Manage page) and launch the URL in the browser.
- Once this is done, you should be able to see the actual system name.