Overview – Create and Manage Users and Response Teams
Creating and Managing Users
Head over to Admin -> Users. This is where you select who should have access to Web ViewPoint Enterprise and its selected features.
Note: ENFORCE-SECURITY parameter needs to be set to “YES” on My NonStop for this feature to be applicable. Otherwise, all NonStop users will have access to WVP Enterprise and all its features. However, they will still be restricted to what their Guardian User ID entitle them to.

User Types
WVP E users are divided into three types:
- Admin – Has access to all features and can perform all user maintenance and access authorization functions.
- First Admin user is set at initial installation.
- The initial Admin user can Add/Update/Delete other Admins, Managers and Staff users. An Admin can also change a Staff user into a Manager.
- Manager – Has access to all features WVP E features but can also be restricted to specific features under the Admin category.
- A Manager can Add/Update/Delete Staff users only.
- A Manager has access to all non-Admin features of WVP E and can assign to Staff users.
- Staff – This type of users can be restricted to specific features.
Adding a User
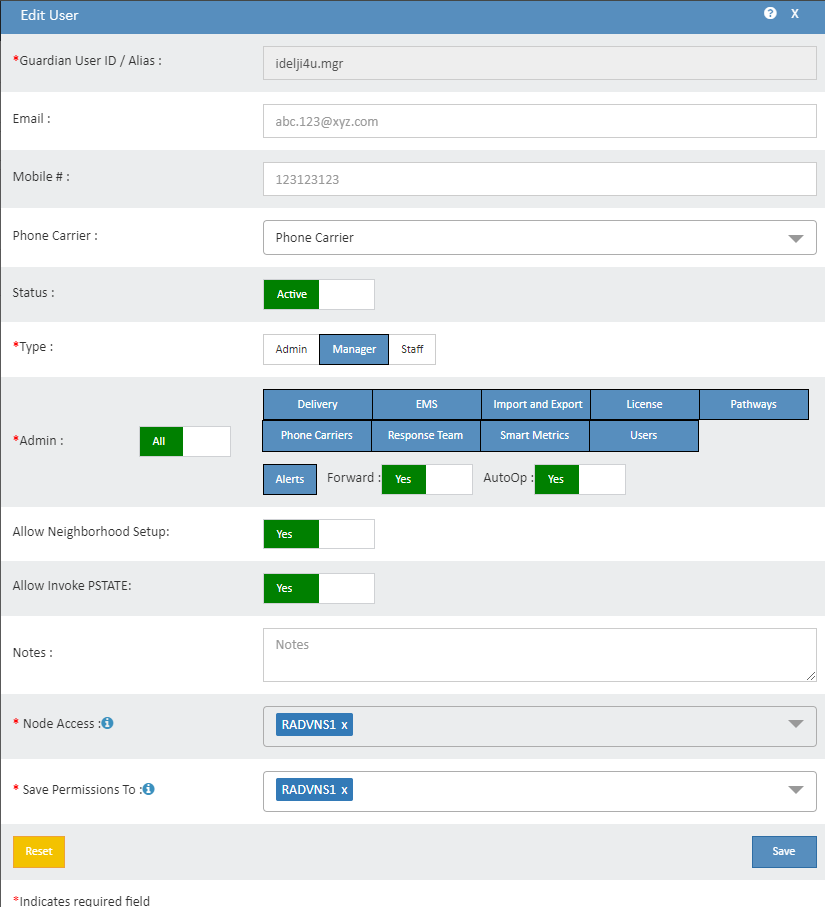
Click on the Add button on the top right to add a new User, and enter the following:
- Guardian User ID/Alias: Guardian username (Group.user) or Alias.
- Email: User’s email address.
- Mobile #: User’s cell #.
- Phone Carrier: Click on the dropdown and select from the available mobile carrier (Note: if desired carrier is not in the list you can add it via Admin – Phone Carriers section).
- Status: Click on toggle button to switch user from Active to Inactive.
- Type: Select from Admin, Manager or Staff user type.
- Allow Neighborhood Setup: Yes/No.
- Allow Invoke PSTATE: Yes/No.
- Node Access: Select node(s) on which the user will have access.
- Notes: Type any notes for the user (max 255 characters).
Click on Save button to add a user.

Editing a User
Click on the Edit icon on the row of the User you select. User’s current setting will be displayed. Make changes as needed and click on the save button when done.
Note: All the permissions provided to the user will be applicable to all the Servers that the user has access to.

Deleting a User
- Click on the Delete button on the row of the User you select from the Users list.
- Select Server(s) that you want to delete the user from. Multiple Servers can be selected from the list.
- Confirm to delete.

Creating a Response Team
Response Team is a list of individuals who do not have NonStop/Guardian user ids but nevertheless need to receive emails or SMS messages in the event of an Alert being triggered. You can configure users without having to associate them with Nonstop user IDs.
Simply navigate to Admin -> Response Team for configuring a user for the Response Team.
Adding a User
To add a new user, click on the Add button on the upper right corner of the screen.
On the new popup Window, enter the following information for the new user:
- Name: Free format name you can assign to the user.
- Email: User’s email address.
- Mobile #: User’s mobile/cell number
- Phone Carrier: Click on the drop down and select from the available mobile carrier (Note: if desired carrier is not in the list you can add it via Admin – Phone Carriers section).
- Status: Click on toggle button to switch user from Active to Inactive.
- For: Select the Server(s) the user should receive Alerts from.

Click on the Save button when done. You can also edit/delete the user as per your preferences later through the Response Team List.